
Removing and Re-installing the Erol's Software
Things must have gotten real funky for you to have gotten to this page. Well, here's the deal. There is the easy way to do this, and the hard way (isn't there always?). If they are using the Netscape 3.0 CD, simply follow the directions below. If, on the other hand, they installed our software from floppy disks (much more likely) click here.
CD Removal and Re-installation
Procedure
Before you begin: Remember to ask the customer if they want to save their bookmarks, address book, or mail. If they do, move the "Bookmarks.html", the "AddressBook.html", and/or the "Mail" folder out of the  folder and place it on the desktop. After the re-install and restart is complete, you'll need to move it back into the
  . Don't worry...I'll remind you again.
- Put the CD in the drive, wait for the icon to appear on the desktop, and double-click it
- Double-click on the installer icon that corresponds to the version of Netscape currently installed (for example,, if they installed Netscape 3.0, have them do it again this time).
- A screen will appear, the upper-left hand corner of which says "Easy Install"
- Click where it says "Easy Install" and choose "Remove" This will remove all the Erol's software (hence the name).
- Perform a Find File for "PPP" and "TCP". With the exception of the MacTCP or TCP/IP control panels (which must be left alone) there should be no items found in the System Folder or any of the folders inside the System Folder. If there are, you should be able to drag them right out of the top half of the "Found Items" window onto the desktop, thereby disabling them.
- Now simply re-run the Installer (either 2.02 or 3.0) best suited to the user's computer. The only real determining factor is how much RAM they have installed on their computer. Considering that Netscape needs a minimum of about 8 megs of RAM to work, People with less than 16 megs of RAM will need to install Netscape 2.02. Anyone with 16 megs and above should be able to run 3.0 with very little problem.
- The installer will prompt you for a restart after it's completed. Go ahead and do this.
Click here for instructions on re-configuring the FreePPP Setup.
Click here for instructions on re-configuring the ConfigPPP.
Floppy Disk Removal and Re-installation
This gets a bit trickier. Most of the floppy disks that have gone out don't have a "remove" feature, so we have to do it by hand. It sounds awful, I know, but it really isn't all that bad. Really.
Procedure
- Double-click on the
 icon
icon
- Double-click on the System Folder
- Locate the "MacTCP DNR" and drag it to the Trash. If it gives you an error message like this:

click here for instructions on deactivating System Folder Protection.
- Double-click on the Extensions folder
- Find the "FreePPP" extension (or the "PPP" if they're using the ConfigPPP dialler. If they're both there, get rid of them both.
- Close the Extensions folder
- Double-click on the Preferences Folder, then check the table below. It lists, by dialler type, the preferences files you should be looking for.
**Note: Remember to ask the customer if they want to save their bookmarks, address book, or mail. If they do, move the "Bookmarks.html", the "AddressBook.html", and/or the "Mail" folder out of the  folder and place it on the desktop. After the re-install and restart is complete, you'll need to move it back into the
  . Don't worry...I'll remind you again.
|
Dialler Software
|
Preferences to be removed
|
|
ConfigPPP
|
MacTCP Prep

PPP Preferences
PPPop Preferences (maybe)
TCP/IP Preferences (maybe)
|
|
PPPop 1.3.2
|
MacTCP Prep

PPP Preferences
PPPop Preferences
TCP/IP Preferences (maybe)
|
|
FreePPP Setup
|
MacTCP Prep

PPP Preferences
TCP/IP Preferences
|
Close all the windows that are currently open
Drag the Erol's Internet folder to the Trash
Perform a File Find for "PPP" and "TCP". With the exception of the MacTCP or TCP/IP control panels (which must be left alone) there should be no items found in the System Folder or any of the folders inside the System Folder. If there are, you should be able to drag them right out of the top half of the "Found Items" window onto the desktop, thereby disabling them.
Empty the Trash (saw that coming, didn't you?)
Restart the computer, holding down the Shift key. This will disable all extensions (necessary to a successful install). Don't worry- the extensions will re-enable themselves during the next restart. Verify that the "Welcome to Macintosh" window says "Welcome to Macintosh Extensions Off" this time. If it doesn't, restart again and make sure they keep holding the Shift key down.
After the computer finishes booting up (it should have gone much faster than normal... no extensions to worry about, doncha know), Put the first of the Erol's diskettes in the drive. When the icon appears on the desktop, it may or may not open a window with another icon labeled "Erol's Installer". If it does, double-click on the Installer icon. If not, double click on the icon for the floppy disk and then double-click on the Installer icon.
Click on "Continue"
Click on "Continue" again
Click on "Install". About half-way through the installation, it will ask you for the second disk. (It had better, any way. If it keeps asking for Disk 2, either the extensions aren't off, or one of the disks is corrupt.
After the install, the Installer will prompt you for a restart. Click on the Restart button.
Re-configuring the FreePPP after install
- Bring up the FreePPP Setup (if they're using ConfigPPP, click here.
- Click on "Accounts". You'll see this:

- Choose the name of location the customer will be using as their local access number.
- Click on "Edit". Towards the top ofthe screen, under the server name you'll see this:

- Verify that the phone number is local to the customer. If it's not, click on "Cancel" and choose the correct one. Once it's correct...
- At the bottom of this screen, there are two fields which look like this:

- Have the customer type in their userid and password, remembering that there is no "@erols.com" after the userid, and that they both need to be in all lower-case letters.
- Click on the "Connection" tab at the top of this screen.
- Verify that the Port Speed and Flow Control are correct.
- Click on "OK"
**Reminder-- if you saved the customer's "bookmarks.html" file, and/or their address book, and/or their "Mail" folder, now is the time to put them back into the
 folder.
- If the customer only has one phone they will need to hang up on you. Advise them to call back if they have any further problems if this is the case. If they have two phone lines, have them try to dial and connect.
Re-configuring the ConfigPPP
- Go up to the
 menu, choose "Control Panels" and select "ConfigPPP" You'll see this:

- Click on the "Server" drop-down menu and choose the location closest to the customer, then click "Config". If the required access number is not present:
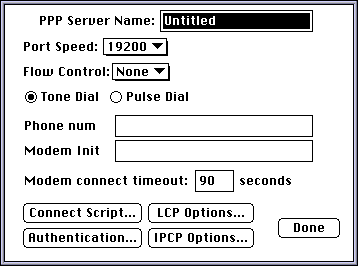
- Click on "New..." You'll see this:

- Type in the a name for the server being dialled. It can be anything really, but it should be something that identifies the phone number being called.
- Enter the phone number being dialed
- Configure the Port Speed and Flow Control correctly.
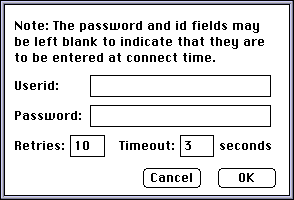
- Click on "Authentication", at which point this screen will appear:

- Type the userid and password into these fields (all lower-case, and no "@erols.com" after the userid.
- Click on "OK"
- Click on "Done"
**Reminder-- If this is a re-install and you saved the customer's "bookmarks.html" file, and/or their "AddressBook.html" book, and/or their "Mail" folder, now is the time to put them back into the  folder.
- If the customer only has one phone they will need to hang up on you. Advise them to call back if they have any further problems if this is the case. If they have two phone lines, have them try to dial and connect.
That takes care of everything except Netscape Mail. To configure that:
- Go into the Erol's Internet folder and double-click on the Netscape icon.
- Go up to "Options" and choose "Mail and News Preferences..."
- Click on "Servers" You'll see this:

- The first two settings are preconfigured for Erol's. The third setting need to be the customer's userid. There should be no "@erols.com" after it, and it should be in all lower-case letters.
- Click on "Identity" up at the top ofthe screen. You'll see this:

- The "E-mail Address" and "Reply-to Address" needs to be <The customer's userid>@erols.com.
- Click on "OK" at the bottom
- Now simply click on the envelope in the bottom right hand corner of the Netscape window. It looks like this:

The first time Netscape attempts to retrieve e-mail, it will ask for a password. Just type it in and click "OK"
A little out of breath? Understandable. As long as their system is working now, why don't you go have a drink? If problems are still present, click here to go back to the first page.


 folder and place it on the desktop. After the re-install and restart is complete, you'll need to move it back into the
  . Don't worry...I'll remind you again.
 icon
icon

 folder and place it on the desktop. After the re-install and restart is complete, you'll need to move it back into the
  . Don't worry...I'll remind you again.


 folder.
 menu, choose "Control Panels" and select "ConfigPPP" You'll see this:


 folder.


