|
Pinhole Astrophotography |
|
Now you're probably wondering ... at a time when, the bigger the optic - the
better the observing (otherwise known as aperture fever) where is this guy
coming from. Well ... some years ago (ca. 1990-91) I wanted to know what the
limits of observing with
the minimum of optics might be. I wondered if sunspots could
be visible through a pinhole camera. It turned into a physics project that
I eventually published in TPO Magazine titled: "PINHOLE SUNSPOTS - Or,
Could the Ancient Egyptians Have Observed Sunspots?". Anyway, this is about that project as well
as some links to other pinhole sites, including one that uses a CCD camera
and pinholes to observe stars. - BDM. |
|
PINHOLE SUNSPOTS or, Could the Ancient Egyptians Have Observed Sunspots? Could the early Egyptians have viewed sunspots? Or, for that matter, is it even possible that any early peoples could have observed these solar blemishes before the discovery of the telescope and its application to astronomy by Galileo? Non-telescopic observations are not limited to just ‘naked-eye’ observing on a hazy day as one might surmise. There is one optical device for which the technology has been available for thousands of years if some curious individuals were only around to serendipitously stumble upon it. This technology is that of the pinhole camera, an optical instrument consisting of only a small circular hole and a screen upon which to project an image. Pinhole observation of sunspots? Hum-bug, you say? Well, maybe not. First, let me relate a little historical trivia concerning early solar observations, and pinhole imagery, although not necessarily related to one another. Solar Observations:
Pinhole Optics and Resolution Most optical devices rely on refraction or reflection to provide an image on a screen or film plane. A pinhole camera is a device which uses neither lenses nor mirrors to produce its image, but rather only a small circular aperture, or ‘pinhole’. This apparent lack of what one might consider an imaging optic does not mean that such an arrangement of hole and screen cannot produce an image. It does and with the greatest depth of field. What it looses when comparing it to other optical instruments is its light gathering capabilities due to the relatively small aperture to screen distance ratio, i.e. the inverse square law. However, even with this shortcoming it still is a candidate for observing the sky’s brightest object, the Sun. Now the questions begging to be answered are:
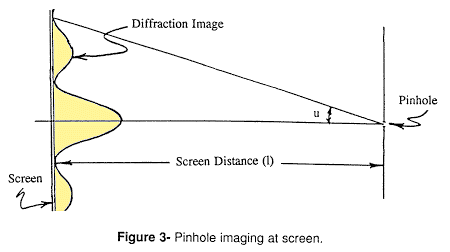
Consider two point sources. Each point will be imaged through an aperture as a central maximum of intensity, or Airy Disk (after physicist George Airy 1801-1892), surrounded by alternating dark and light diffraction rings. If the points are close, the diffraction patterns will overlap (Fig. 2). Two points are resolved by an optical instrument when the image separation reaches 0.61  X/Sin(u), where X = the wavelength of light and u = the angle formed by the
aperture radius and the screen distance (Fig. 3). X/Sin(u), where X = the wavelength of light and u = the angle formed by the
aperture radius and the screen distance (Fig. 3).
This method for determining the resolution is known as the Raleigh Criterion and is a mathematical description of when the maximum of the diffraction pattern from one point source coincides with the first dark ring by the second point source, and where there is a clear separation of the intensity maxima in the combination pattern, i.e. You can still discern two points, not two so close they appear as one. The equation defining the radius Z from the center of the Airy Disk to the first dark ring of a diffracted point image may then be defined as:
The maximum resolution for an aperture having no lens or mirror should occur when the radius of the pinhole equals the radius of the central maximum of the Airy Disk, i.e. Z = r. Then the equation becomes:
Plotting the Relative Resolution vs. Pinhole Diameter (Fig. 4) results in a distinct proportional relationship which forces us to the, seeming odd sounding, conclusion that the larger the pinhole, the better the relative resolution of the solar image.
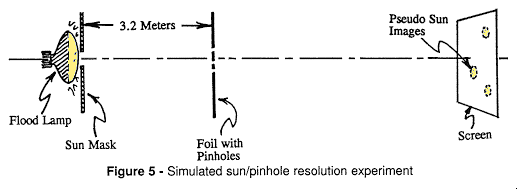
The limit then is the distance at which the solar image becomes too dim to see due to increased hole-to-screen distance. Testing the Optimum Resolution and Screen Distance To test the aperture diameter to screen distance theory, I first simulated the Sun by taking a 375 watt flood lamp, placing a mask in front of it having a circular opening of 3.0 cm diameter and positioning it 3.2 meters from a sheet of aluminum foil into which had been poked three holes of 1, 2 and 3 mm diameter (Fig. 5).
The mask diameter to distance ratio simulated the same angular diameter as the Sun (about 0.5 degrees). I then placed a screen behind the pinholed foil and searched for the optimum distance at which each projected image appeared clearest. The distances obtained were 0.7-0.8 m, 2.8-3.1 m and 6.5-7.0 m, respectively. These results correspond well with the calculated results in Table I.
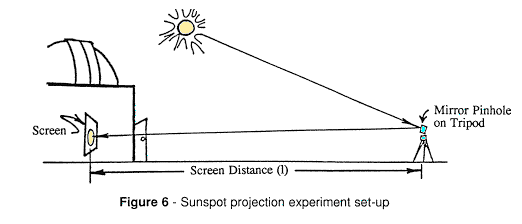
I then placed a strip of paper 1.5 mm in thickness across the simulated Sun to see if the projected images would resolve this 1/20 solar diameter object. It did, and very clearly, in all cases which lead me to believe that at least large sunspots would be visible in a pinhole projection. The Sunspot Projection Experiment Rather than build a huge stone observatory pyramid or other clumsy pinhole observing device, since long pinhole to screen distances were required, and my research budget was minimal, I decided to ‘cheat’. I decided to use a reflection pinhole. I acquired a first-surface mirror to reflect the Sun’s light which would allow me to direct the Sun’s light with very little effort over the long distance needed to attain a sufficiently large projected solar image. The small mirror was mounted with masking tape on the head of a camera tripod for stability and maneuverability. I then chose a sufficiently large hole by taking another strip of masking tape, punching a hole in it with a commercial paper hole-punch, and affixing the tape to the mirror surface. This produced a mini-mirror pinhole aperture (d) of 5.9 mm diameter. Calculating the optimum screen distance (l) for the clearest image resolution (25.9 m), I placed the tripod behind Sperry Observatory (at Union County College, Cranford, NJ) so that I could reflect the Sun’s image through the rear door onto a white oak-tag screen set up in the darkened building (Fig. 6).
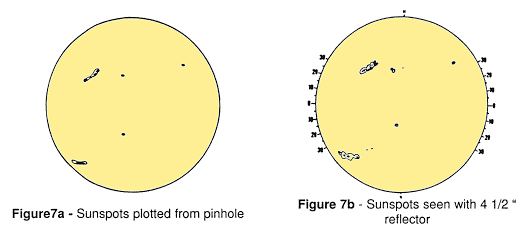
The resulting solar image was 24.1 centimeters in diameter. Noting several sunspots visible, I proceeded to trace their images onto the screen (This is much more difficult than it sounds since the Sun is a fast moving target, particularly at this projection size and no tracking involved. Several attempts were made at marking the sunspot positions and shapes to assure reasonable accuracy.) Five sunspot were easily identified (Fig. 7a), two very large and three moderately sized ones. After acquiring this data I made projection drawings using a 4-1/2 inch reflector for comparison onto a standard size solar observing sheet. To make the two sets of data comparable in size, I Xerox reduced the pinhole projected data using the proper reduction ratio to make the two drawings of equal size. Also, instead of copying onto paper, the reduction was made onto clear sheet Mylar which allowed me to flip the image over since the pinhole projected image had been left-right reversed with respect to the standard drawing. Comparison of the drawings reveals very similar images. The only differences are: the three very small sunspots in the 4-1/2 drawing that do not appear in the data from the pinhole projection; and the degradation of detail around the pinhole projected spots is of much lesser quality. Notes and Conclusions The only optical imaging problem I encountered was thermal air turbulence due to the solar image being projected parallel to the ground from the cold outdoors into the warm observatory. This, however, did not appear to degrade the image in any great detail. The intensity of the 24 cm solar image was easily bright enough for viewing and a larger pinhole could have been chosen, at least one producing twice the projected solar diameter. However, increasing it much beyond this would decrease the image intensity to the point that much of the gained detail (due to the greater relative resolution) would probably be lost to a dim image since the intensity of the image decreases geometrically as a function of d/l2.
Comparing the results in Fig. 7 clearly indicates that the large sunspots, as well as those of moderate size, could easily have been viewed using pinhole projection by some ancient observers had they been so inclined. | |||||||||||||||||||||||||||||||||||||||||||||||||||||||||||||||||


 X/Sin(u) = 0.61
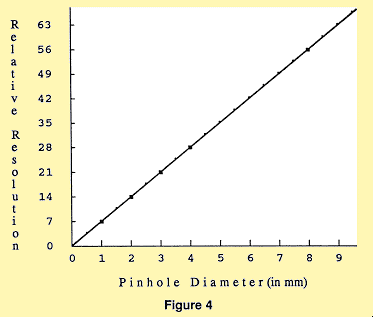
|
Maintained by BDM
njastro@erols.com