Ken's
Flex Track for Lego Trains
|
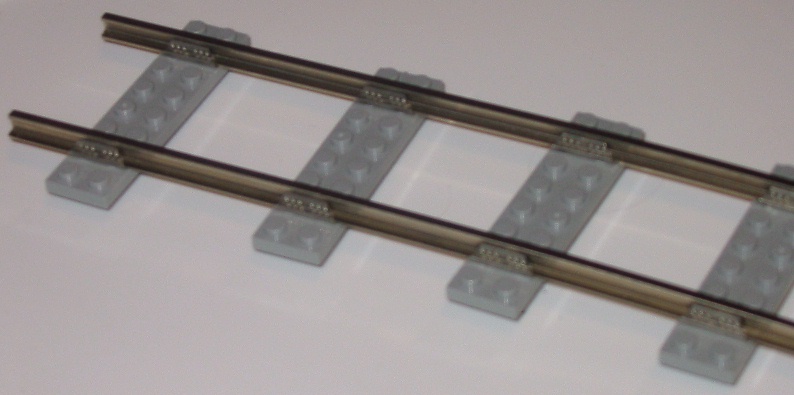
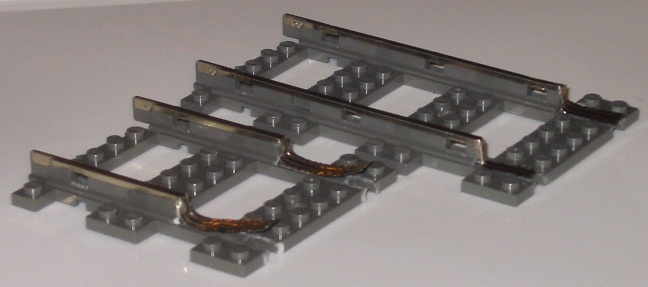
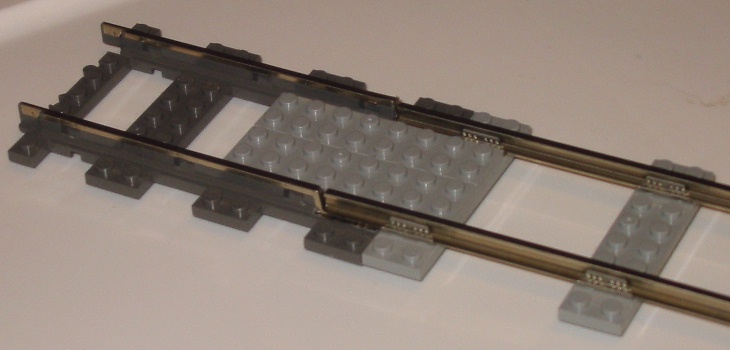
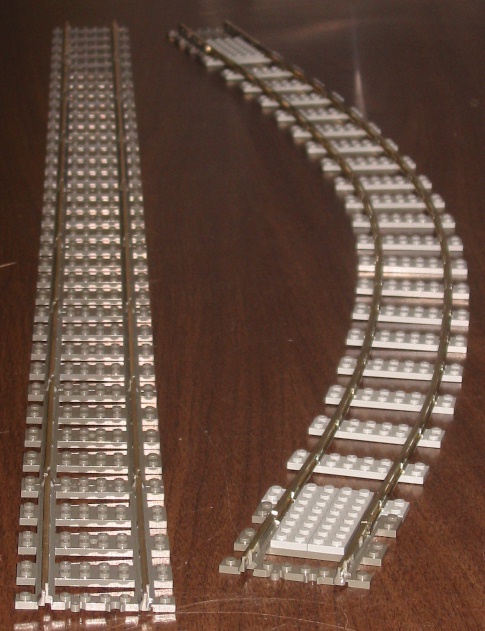
Klik hier voor de Nederlandse versie. At the January 2005 meeting of WamaLUG, I was involved in a discussion about how it would be possible to make flex track that could be used with Lego track. Below are the results of my subsequent deliberations on the subject. Materials: A length of Atlas O-gauge flex track. Three packs of Atlas O-gauge rail joiners. (16 per pack) 25 2x8 Lego plates. 2x4 brick Two straight Lego tracks Note: Other brands of O-gauge track or rail may also be used, Be sure to get the correct rail joiners for use with the track. Check to be sure the rail joiners can be used in the manner described below. Tools: Rail nippers. X-Acto No. 152 1/4" wide carving chisel blade Jeweler’s Pliers Small punch Soldering Iron & Solder Hacksaw Clicking on the title shows a picture. Making the Track Ties (or Sleepers). The first step is to shave off the second row of studs from each end of 21 of the 2x8 plates. Save 4 uncut plates for later This will reveal two holes on each end. Turn over the plate and shave off the edge of the posts next to the newly exposed holes. Using the rail nippers, clip two tabs in the bottom of 42 rail joiners. Some breakage may happen, but you do have extras if needed. Using the jeweler’s pliers, bend each tab down 90 degrees. Insert the tabs into the holes on the 2x8 plate. Turn over the plate and use the small punch to fold the tabs toward each other. Ideally, the tabs will be touching each other. Solder the two tabs together. This should be done quickly lest you melt the plate. Repeat the above steps until you have 21 plate and rail joiner assemblies. Disassemble the O-gauge track by pulling out the rails. The plastic ties (sleepers) will probably break, but we have no use for them anyway. This will yield two nickel-silver rails and a black rail. The nickel silver rails are the ones to use. If you have two of the black rails, you can also use them. I don’t think one of each color would look proper, but it is your railroad. Decide how you want the rails to bend. Do you want a straight section? S-curve? Gentle curve? Fixed radius curve to parallel the standard Lego curve? Now is the time to decide because the rail needs to be bent to the desired curve before installing the ties. While it is possible to bend the track after the ties are installed, it is a difficult process, and may result in some of the rail joints breaking off the ties. Having chosen the desired curve and bending the track sections to match the inside and outside radii, slide a tie or two on one end. Align the two track ends with each other. Slide the additional ties onto the other end. Slide them all the way down to the first end. leave about 1-1/2” between the ties. After all the ties are installed, you will see the inside rail (if curved) is longer than the outside rail. Before trimming it, adjust the position of the ties. I used a 2x4 brick as a spacer between the ties. This is double the spacing used in Lego track. You may use a different spacing if you wish. If you place them further apart, be sure that the gauge of the track will be maintained. Test fit the track where you will be using it. After you are satisfied with the spacing of the ties (sleepers) and the curvature of the track, trim off the extra length of the inner rail with a hacksaw or other appropriate cutting tool. To make the connecting track, I removed the metal rails from the plastic base on a section of straight Lego track. I then trimmed the end tie (sleeper) from the base, including the extension under the rail. I then clipped the plastic rail above only the next tie (sleeper), shaving the plastic down to the level of the tie (sleeper). I trimmed the metal rail so it extended past the cut rail about an inch. I reinstalled the metal rail on the plastic rail. Trim the inside part of the rail to allow for wheel clearance, and flatten the extra length of rail. Bend the rail down and along the tie (sleeper). Do this for both rails. Now make a second one for the other end of the track. The connecting tracks I made are different lengths. I did this so the entire assembly would be 9 track sections long. Place the end of the flex track on the end of the connecting track. The flex track tie (sleeper) and the connecting track tie (sleeper) will butt up against each other. The O-gauge rail will set on top of the bent down metal rail and butt against the ends of the plastic rail. This is for good electric contact. Use one or two of the remaining 2x8 plates to hold them together. You may also use 1x8 plates outside of the rails. 1x8 tile plates may also be used. Here is the completed track shown next to 9 sections of straight track. Created February 13, 2005. Updated March 28, 2005. Email comments to kennrice@erols.com |
|
|