NetBSD Mac 68K Installation Guide
Welcome to the world of NetBSD, a free and exceptionally powerful version of
BSD 4.4 UNIX. This quick reference guide is intended to help you get NetBSD
installed and running on your 68K Macintosh, but it is by no means a substitute
for a good UNIX book. You can find many good reference books at your local bookstore
and I recommend you get one. Let's get started.
Basic Hardware Requirements:
- Macintosh with a 68030 processor, a 68030 and a 68882 floating point unit
(FPU) or a 68040 processor with a built-in FPU. I cannot recommend any Macintosh
with an LC040(no FPU) processor as NetBSD is not 100% stable using FPU emulation.
If you have one of these models, I recommend upgrading to a full '040 processor.
- 8 MB of RAM minimum. 16 MB is recommended.
- 80 MB hard drive. 200 MB hard drive is recommended for X-Windows use.
- Built-in or Nubus video.
- An ethernet card with a 10Base-T connection.
The rest of this document details the preparation and installation of NetBSD
on a typical 68K Macintosh computer. Specific machine parameters such as hard
drive size or RAM may vary, but the steps you follow will be the same.
Hardware Preparation:
- Once you have located a suitable Macintosh to use for NetBSD, you need to
partition the hard drive using the HD SC Setup application.
Partitioning the hard drive WILL ERASE ALL DATA on that drive,
so PLEASE make sure you don't have files on that drive you are not willing
to LOSE FOREVER.
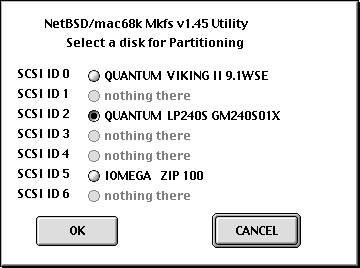
- Open the application and select the SCSI ID of the drive you wish to partition.
It is usually ID "0" unless you have another drive installed in your Macintosh.
See the display below.
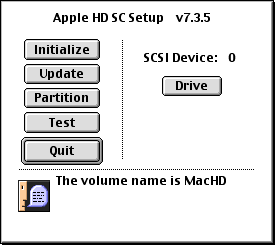
- Click the "Initialize" button to initialize the hard drive, install the
drivers and zero all data on the drive. Again, this will erase all files
on the drive. This can take several minutes depending on the size of the
drive and the speed of your Mac, so be patient.
- After initialization is complete you will be returned to the main menu shown
above. Click the "Partition" button to setup your NetBSD partitions. The figure
below is the window you should see. Click on the "Custom" button.
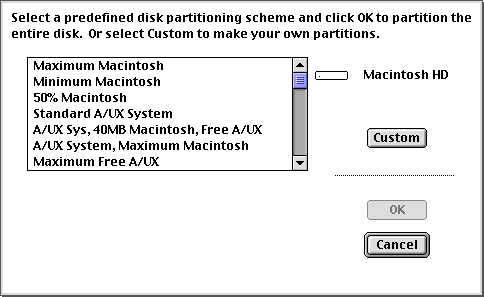
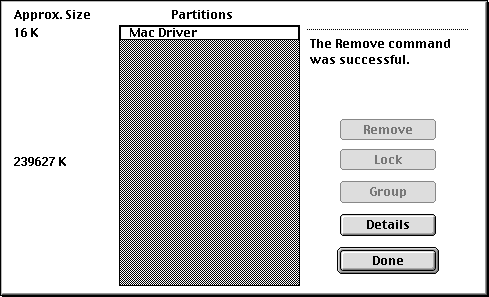
- The window shown below will appear. Click the Macintosh HD partition and
remove it using the "Remove" button which is only available after clicking
on the partition.
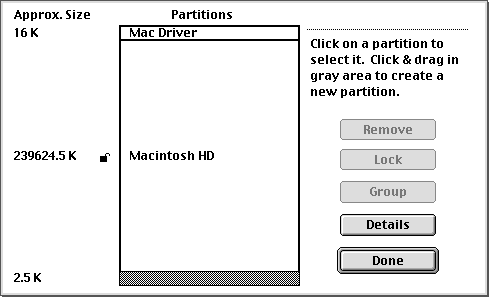
- The resulting partition table is shown below
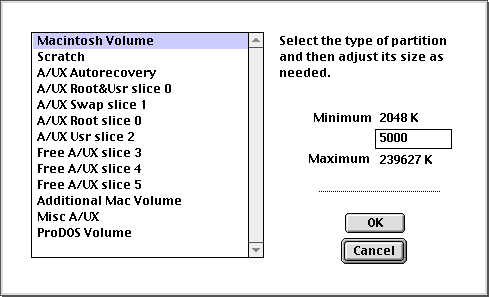
- Click in the gray area and using the window below select a Macintosh Volume
between 5 and 10 MB(5000K or 10000K). Click the "OK" button when done.
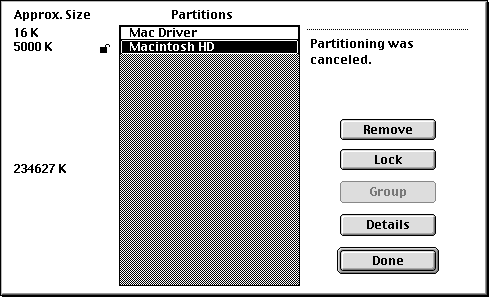
- The new partition table should look as shown below. Click again in the gray
area to return to the partition window shown above.
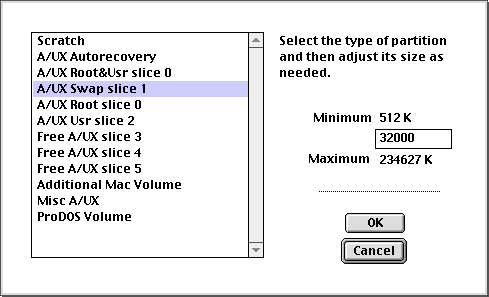
- Select the A/UX Swap slice 1 and set the partition size to either 16MB or
32MB depending on your hard drive size. The larger you make the swap partition,
the less space you will have for NetBSD applications. 16 MB is the minimum
you should use. Click the "OK" button when finished.
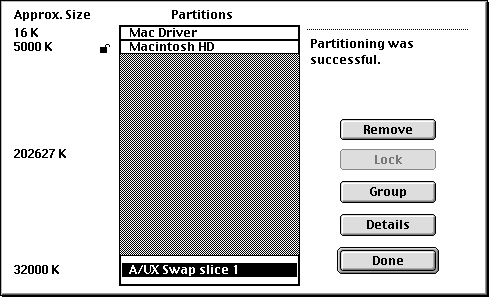
- You will be returned to the partition window seen below. Make a note of
the remaining free space shown by the number on the left-hand side. In this
example it is 202627K. This will be the size of the NetBSD Root&Usr partition.
After writing down the free space value, delete the A/UX Swap slice 1 by selecting
it and clicking the Remove button.
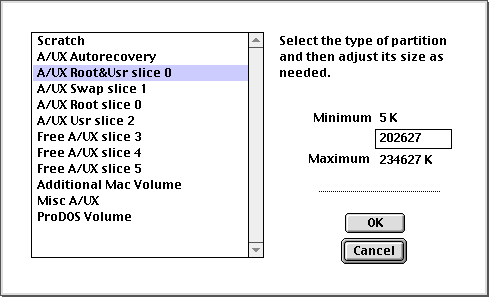
- Now select the gray area and return to the partitioning window shown below.
Select the A/UX Root&Usr slice 0 and set the value to the free space value
you wrote down from the previous step. Click the "OK" button when finished.
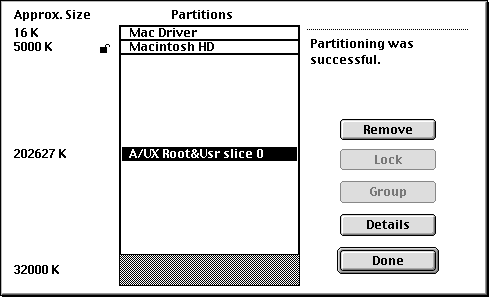
- You will again be returned to the partition window. As you can see the remaining
free space is exactly 32MB(32000K). This is the value we specified as the
swap space in a previous step. Click on the gray area one last time and return
to the partitioning window.
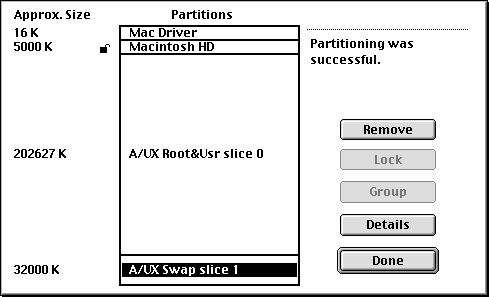
- Select A/UX Swap slice 1 and set it to 32MB(32000K) as we did in a previous
step. Click the "OK" button when finished.
- That's it. Your hard drive is now partitioned and ready for the NetBSD utilities.
The final partition map is shown below. Click the "Done" button and quit out
of the HD SC Setup application.
Formatting the NetBSD Partitions:
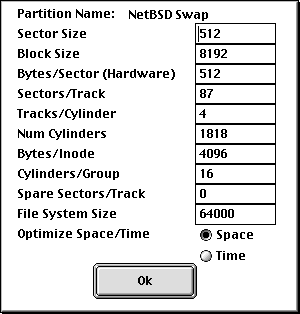
- The Mkfs utility is used to format the A/UX partitions to NetBSD
's UFS format. Open the application and you will be given a window shown below.
Select your NetBSD hard drive and click the "OK" button.
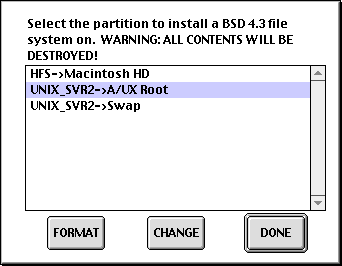
- The window shown below will be displayed. Select UNIX_SVR2->A/UX Root
and click the change button.
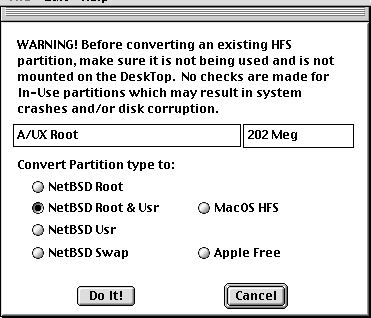
- The window shown below is displayed. Select NetBSD Root&Usr and click
the "Do It!" button. Repeat this process for the UNIX_SVR2->Swap partition.
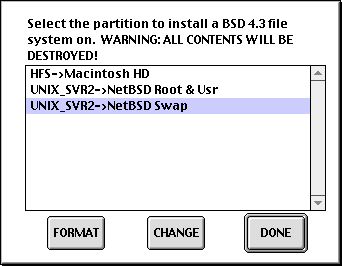
- After you have completed changing the partition types, it is time to format
them. Click on the NetBSD Swap partition and click the "Format" button.
Click the "OK" button shown in the figure on the following page to begin
the formatting process. The formatting process takes a few seconds for the
swap partition and may take a few minutes for the root partition. Click the
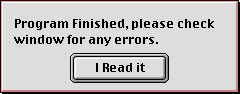
"I Read It" button when it is displayed completion of the formatting procedure.
Repeat the process for NetBSD Root&Usr.
- Once the NetBSD partitions have been formatted, it is time to start the
installation.
Setup The Mac Partition:
- NetBSD requires the MacOS be up and running prior to booting. You can install
any MacOS which support you particular 68K macintosh, but I recommend one
of the System 7 OS's. If you are using my CD for installation, you will find
copies of System 7 and 7.5.3 installers. I also placed a System 7.6 minimal
universal folder on the CD which you can copy directly to your Mac partition.
System 7.6 should support all 32-bit clean ROM Macintosh computers such as
the IIsi, IIci, etc.
- The IIcx and SE/30 are two popular Macs that are not 32-bit clean. In the
case of these machines, you must install Mode 32, also included on
the CD.
- After you have installed a working MacOS, copy the NetBSD/Mac68k Installer
and BSD/Mac68k Booter applications to the Mac partition.
- Boot your 68k Macintosh off of your newly created NetBSD hard drive to complete
the installation process. Make a note of the SCSI ID setting of your hard
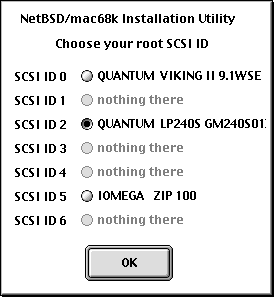
drive as you will need to specify this to the Booter application.
Installing NetBSD:
The installation process should work with any version of NetBSD from 1.3 to 1.4.2. I recommend getting the latest version of NetBSD for mac68k as this will be the most stable. The latest version is available for download from http://www.netbsd.org and is packaged as a series of *.tgz files. The application NetBSD/Mac68k Installer will be used for this process. If you have a copy of my NetBSD CD, installation will be much easier. In most situations you will need to use an external SCSI device such as a CD-ROM drive or external hard drive containing the necessary NetBSD files to complete the installation process.
- Open the installer application and select the NetBSD hard drive using the
window below.
- Click the OK button. Select "Install" from the File menu to get the file
selection dialog shown below. Choose the files you wish to install by clicking
the "Add" button when the file is highlighted. Click the "Done" button when
all of the files you wish to install have been selected. You must install
base.tgz, kern.tgz and etc.tgz at a minimum. The rest are optional, but may
be required if you want such things as a C-compiler(comp.tgz) or man pages(man.tgz).
If you are using my NetBSD distribution, please select one of the following
based on the disk space you have available on your root partition:
- base.tgz - requires 60 MB of disk space.
- full.tgz, - requires 120 MB of disk space
- full+X.tgz - requires 150 MB of disk space

- After you click the "Done" button, the installation process will begin and
progress will be shown in the console window. If you are using my CD for installation,
please exit the installer application because the devices have already
been built in the *.tgz file. Otherwise, once the installation is complete,
select "Build Devices" from the File menu.
- This creates the device files necessary to run NetBSD. The console window
will show when this is complete. See the figure below. Once the installation
is complete, exit the installer application. You are now ready to boot NetBSD
for the first time.

Booting NetBSD:
Booting NetBSD requires you to boot into the MacOS first and then into NetBSD.
This process initializes much of Apple's hardware prior to booting NetBSD. If
you are not booting off the Mac partition of your NetBSD hard drive at this
time, please do so before attempting to boot NetBSD.
- To boot into NetBSD, open the BSD/Mac68k Booter application. After
opening the application, select Booting from the "Options" menu. The following
window will appear.

- Set the Partition to "NetBSD Root&Usr" if it is not set already. If
you did not use my NetBSD CD for installation, you must also check the "Single
User" option. Also, if the SCSI ID of your drive was not 0, you must change
it in the window to reflect your SCSI configuration.
- Once you have made the necessary changes, click the "OK" button. Select
Boot from the menu or hit "z +B" to boot
into NetBSD. If everything goes well, you will see boot messages appearing
on the screen until you reach either a login prompt or a colon prompt. If
you used my installation *.tgz files, the root password was only set in the
full+X.tgz distribution to "pass". In the other two, the password was left
blank. If you didn't use my install files, continue onto the next step.
- If you booted in single user mode, you will need to hit the return key once
booting stops at a colon prompt. This will dump you into a console shell.
I like to use vt100 terminal emulation, so type the following:
export TERM=vt100
tset vt100
clear
This will set your terminal for editing the rc.conf file using the vi
editor. Type the following to edit the rc.conf file:
vi /etc/rc.conf
If the above fails with some sort of error about read-only filesystem type
the following to force the root partition to mount:
mount /dev/sd0a /
Ignore any errors about checking the filesystem. Now retype the vi command
you just tried to open the rc.conf file. You must change rc_configured=NO
to rc_configured=YES. Uncomment the export PATH line above this
also. Save the file and exit. Type reboot at the prompt to boot back
into the MacOS.
- Once back in the MacOS, open the booter again and uncheck "Single User".
You are now ready to boot into and start using NetBSD. Login as root. Your
password is blank until you set it using the passwd command. Enjoy
!!!!
See the document titled "NetBSD Quick Guide" for helpful UNIX hints. It is available at http://www.erols.com/ewinkler or on the CD-ROM.
Still more questions - See my Help Links.